Hello SBI Community,
I will show you how to use MITM Proxy to capture HTTP & HTTPS traffic (HTTPS private tracker announces) on a Windows 10 O.S. by performing a Man-In-The-Middle Attack on your own system.
You must set up a proxy server and configure your device to route traffic. Heres a step-by-step tutorial on capturing Private Tracker announces for debugging/mod client file making/etc.
Lets get started. But before that, youre going to need a couple of things. They are: -
- Copy of MITM Proxy (Im using version Windows v10.3.0 64bit version).
- Torrent Client (Im using qBittorrent v4.6.4).
- Private Tracker (Im using BootyTape.com).
- Notepad (I'm using Windows Notepad).
Now comes the part of installing MITMProxy and setting it up on your system.
1) Installing MITMProxy: Head to the website (https://mitmproxy.org/) and download the Windows Installer.
Image: - 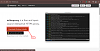
2) A) Install MITMProxy on your device: - Install the software by double-clicking on the installer or right-clicking and choosing Install.
Image: - 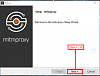
2) B) Choose the Installation directory: -You must choose where to install MITMProxy. By default, the C:\Program File\mitmproxy location is set by default. It is best if you leave it at that.
Image: - 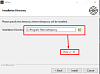
2) C) Uncheck the "Launch MITMProxy now" box and click on "Finish".
Image: - 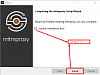
Now that we've installed MITMProxy on our system we need to set up the proxy server in order route traffic through it.
3) A) On Windows 10, search for Proxy Settings on your system.
Image: - 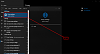
3) B) Type http://localhost in the address. Type 8080 in the port. Make sure to click save in the proxy settings.
Image: - 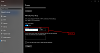
Now we've set up the proxy. The next step is installing the MITMProxy root certificate so that it is trusted by the system and you won't need to click through a TLS certificate warning on every domain.
4) A) Visit (https://mitm.it/) on your browser, and you should see the MITMProxy root certificate installation option. Download it for windows.
Image: - 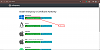
4) B) Choose Current User for the storage location of the certificate.
Image: - 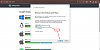
4) C) Choose the certificate by finding it on your download location and click on Next.
Image: - 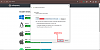
4) D) Dont type any passwords. Choose Next.
Image: - 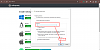
4) E) Choose Automatically select the certificate store based on the type of Certificate.
Image: - 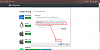
4) F) Choose Finish to install the certificate.
Image: - 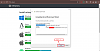
4) G) Choose "Yes" to the security warning.
Image: - 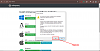
4) H) Choose "Ok."
Image: - 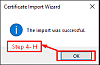
Now that we've installed the certificate. It is time to check whether the certificate was installed correctly. This step is completely optional.
5) A) Search for Manage User Certificates on your system.
Image: - 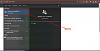
5) B) Search for Trusted Root Certifications Authorities -> Certificates. Scroll down to find the one used by MITMProxy.
Image: - 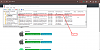
Now that we're done with installing MITMProxy, its certiifcate and setting up the proxy server. It is time to fire up your torrent client. Im using qBittorrent, which has its own networking library. Therefore, it will ignore the system proxy setting, so you must use the same I.P. and Port you set up on your system level in qBittorrent.
6) Open qBittorrent->Tools->Option->Connection and choose the proxy type=HTTP, IP= 127.0.0.1, Port= 8080. Apply and then save.
Image: - 
7) Head over to your MITMProxy install directory, i.e., C:\Program Files\mitmproxy\bin\ and run the mitmweb.exe program. You dont need to run it with your Command Prompt/Terminal.
Image: - 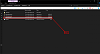
8) A browser instance will open with the address http://127.0.0.1:8081/#/flows. This is where you will see all traffic (tracker announces requests and responses).
Image: - 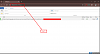
9) Start 1 or more torrents in qBittorrent; you should see the HTTPS announces in the MITM web browser.
Image: - 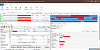
10). You can copy the data, i.e., the Tracker announces requests and responses from the server, and save it on your notepad. You can then share it with a member of this forum for debugging/mod client-making purposes.
Image: - 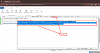
11) Make sure to turn off the proxy that you've set up in Step 3.
Image: - 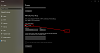
Otherwise, you going to face problems with connecting to the internet as seen in the below image.
Image: - 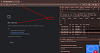
Important Notes: -
- MITM attacks are illegal without permission. Ensure you have the legal right to capture traffic on the network youre monitoring.
- Always use this tool responsibly and ethically, and respect user privacy and confidentiality.
- The captured traffic may contain sensitive information, so handle it with care. You must censor your private passkey, info hash, peer I.D., port, key, and I.P./I.P.v6 address if you plan to share the data on the forum, as other members can access them and use your sensitive information for nefarious purposes unless asked otherwise.
- MITM Proxy can run on Windows, Linux, and macOS. Please read the installation guide to learn how to install it on your system.
Installing MITM Proxy on different OSes? Follow the instruction in the below link.
Code:
https://docs.mitmproxy.org/stable/overview-installation/
Credits: -
@anon - Thanks for all the help with this tutorial. I couldnt have done it without you.
So that about sums it up. If you have questions or think something must be added here, let me know.
~cloud99


 Reply With Quote
Bookmarks